Hydroponic gardening requires you to be familiar with its components in order to fully understand its operation. These components are essential in running a hydroponic system. Here, we will go over a few of them. Also learn about the Nutrientfilm technique and Dutch bucket system. We'll explain the differences and benefits of each type. Last but not least, Hydroponics will be discussed as a way to make gardening more efficient.
Aeroponics uses nutrient-rich aerosol
Aeroponic gardening is where roots are suspended in nutrient rich aerosol and exposed to oxygen and the air. The air is sprayed onto the roots and they absorb nutrients and water. A hydroton clay or coco-coir alternative is used to support the plant's root system. The reservoir is treated using low-strength hydroperoxide. During the process of growing, roots are placed in an empty chamber. They are then exposed to air and nutrient rich aerosol.
Aeroponics hydroponics systems are efficient and environment-friendly. They can also be transplanted quickly. They also don't suffer from diseases and pests that can infest a traditional hydroponic system. A typical enclosure for an aeroponics system eliminates the need to use chemicals to control pests and weeds.
Aeroponics can present a challenge because you must be precise and meticulous. There are specific parameters that must be followed to ensure optimal nutrient concentration in the water. Your harvest could be destroyed by even the smallest malfunction in the equipment. The roots may become dry if you don't sprinkle every few minutes. It is important to keep the misters clean as minerals in water can cause them to clog.
An aeroponics system can be used to provide nutrients and oxygen to the roots of plants. Aeroponics systems reduce the amount of soil required, allow the plant to grow more quickly, and encourage cloning. Aeroponics systems require less space than traditional hydroponics systems. They also promote exceptional growth rates and yields. There are many types of aeroponics systems on the market, including low-pressure and vertical systems.
Dutch bucket system
It is easy to create your own hydroponic gardening garden. With the Dutch bucket system, you will only need a few essentials, including a central reservoir for your hydroponic medium. To avoid algae growth, the Dutch bucket must be made of dark material. Installing proper bulkhead fittings is also a must. Moreover, you should install shut-off valves to isolate plants when necessary.
First, measure the area where your growing medium is to be placed. Then you can cut the half-inch poly tubing to the size of the buckets you are placing. Then, connect the buckets to the drainpipe and install feeding tubes that have emitter holes on them. After this, you're ready to start your own hydroponics system.
The Dutch bucket system for hydroponics has the main advantages of being low-cost and easy to construct. It doesn't require complicated fittings of hoses and has a central tank. Hydroponics systems are also very cost-effective. You only need to fill it once. This can save you time and money. It is essential to maintain a clean reservoir and clean water source if you use this method. Your plants will not be benefited by an alkaline or too acidic solution. You should ensure that your reservoir has a balanced pH.
The Dutch bucket system for hydroponic gardening is a convenient solution for growing large plants in small spaces. The water-based liquid flows from a separate reservoir and drips into buckets. Once a bucket fills, excess solution drains back into the reservoir. This irrigation system may have several buckets. Additional solution can then be pumped out via a drainage line connected to each bucket.
Nutrient-film technique
Hydroponic gardening's nutrient-film method involves covering the roots with a nutrient mixture. This method is ideal for controlling watering and was once considered the best. However, optimization strategies were difficult to create due to the absence of substrate. This technique is therefore only suitable for a limited number of crops. Here are some of the advantages and disadvantages of this method.
Hydropnic gardening's Nutrient film technique involves placing a thin layer on the roots of nutrient solutions. This keeps them dry while providing enough oxygen. This technique is ideal for plants that are light and fast growing, but don't need much support. It is not recommended that top-heavy plants use this technique. They won't grow as tall when they are in soil.
The simplest of both the hydroponix techniques is the Nutrient film technique. A channel is created in which nutrient solution is poured into a shallow hole. Plant roots grow on top of this nutrient solution. The microclimate created through the application of nutrients solution to roots encourages the growth and development of strong, healthy plants. It's also simple to use and suitable for both advanced and novice growers.
One of the most important principles in hydroponics is the nutrient-film technique. It utilizes a channel with sloped sides, and pumps water through the channel. The water in this channel gives water to the plants. However, the solution also contains nutrients. This setup is similar the Ebb and FLOW method, however it utilizes water pumps.
NFT system
The NFT system uses a reservoir inside a grow tray with a pump at the top and a drain pipe on the bottom. If the reservoir is connected to an outside pump, it is possible to place an air stone inside. This is vital because plants will benefit from the highest levels of nutrients and oxygen in the water they drink. There is no timer built into the NFT system. If you can't turn the pump off or are unable to power it down, the pump will run continuously.
Air stones are not required for NFT systems. Instead, the water levels must be kept low to ensure roots get oxygen. An air pump helps prevent root rot by providing oxygenation. The slope of the nutrient reservoir must be such that water flows freely. A timer is used to control the pump's timing. The water in your grow channel should be sloped to prevent water from splashing.
NFT works best for fast-growing light plants. Lettuce makes a great example. Popular varieties include Cherokee, Ruby Sky, Ostinata, and Flandria. Some people have grown strawberries and other perennial plants in an NFT system. You may need to purchase an independent trellis system if your goal is to grow a larger crop.
Whether you're a first-time gardener or an experienced grower, the NFT technique will benefit you in more ways than one. This method is high in nutrients, easy to manage, and long-lasting. This system is also useful for growing herbs and strawberries. NFT offers several benefits including:
Ebb & flow system
The ebb flow system for hydroponics allows you to grow plants in a variety of ways. It gives plants oxygen and nutrients, while reusing your existing nutrient solution. It's also very economical, as your nutrient solution is recycled continuously. Although the ebb-and-flow system may seem intimidating to beginners, it is easy to master and you will soon be growing vegetables, herbs and fruits.
You can use a rockwool or perlite mixture to grow plants. Coco coir, however, is another option. Soil retains water and doesn't expose roots the same oxygen levels as hydroponics. You can also use a fluorescent "grow stick" for less than $25, but it will not produce the lush growth you're after. It is best to choose a 200-watt lamp.
When choosing an Ebb and Flow, you should consider the size of the tubing you use. If you intend to use 3/4-inch fittings, tubing should be at least 1 1/2 inches thick. You can also use a suitable substrate to grow your medium. If you use rockwool, you might consider purchasing a Coco Boss block or Growcube. You can also use perlite in pots and grow cubes. You can also get a hydroton rock in a net pot.
An Ebb and flow system is easy to set up. It consists of two separate containers. One is a plastic bucket which is placed inside the flooding tray. The pump transports the nutrient solution to the tray from the reservoir. You can use multiple buckets depending on your plants' needs. A timer can be used to adjust the level in each container automatically if there isn't enough room.
FAQ
What is a planting plan?
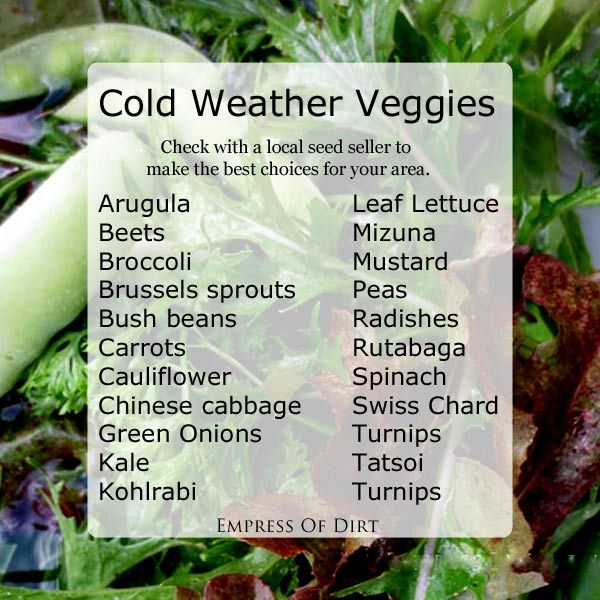
A planting calendar lists the plants that should all be planted at various times during the year. The goal is for plants to grow at their best while minimizing stress. The last frost date should be used to sow early spring crops, such as spinach, lettuce, and beans. Later spring crops include cucumbers, squash, and summer beans. Fall crops include potatoes, carrots, broccoli, cauliflower and broccoli.
Which is the best layout for a vegetable garden?
Your location will determine the best layout for your vegetable garden. For easy harvesting, it is best to plant vegetables in the same area as your home. For maximum yield, however, it is best to space your plants if you are in a rural area.
When to plant flowers
Planting flowers during springtime is best when temperatures are warm and the soil feels moist. If you live somewhere cold, planting flowers should be done before the first frost. The ideal temperature for indoor gardening is 60 degrees Fahrenheit.
Can I grow fruit tree in a pot?
Yes! If space is limited, you can grow fruit trees in pots. Ensure your pot has drainage holes so excess moisture won't rot the tree. Also ensure that the pot is large enough to accommodate the root ball. This will help prevent stress on the tree.
How big is a vegetable gardening space?
A good rule of thumb is that one square foot of soil requires 1/2 pound of seed. For example, if you have a 10 foot by 10 foot area (3 meters by three meters), 100 pounds of seeds will be required.
When to plant herbs
When the soil temperature is 55°F, herbs should be planted in spring. To get the best results, they should be planted in full sun. To grow basil indoors you need to place the seedlings inside pots that have been filled with potting soil. Once they start sprouting leaves, keep them out from direct sunlight. When plants are growing, place them in bright indirect lighting. After approximately three weeks, transplant them into individual containers. Continue to water them as needed.
Which seeds should start indoors?
A tomato seed makes the best seed for indoor planting. Tomatoes are very easy to grow and produce fruit year-round. If you are growing tomatoes in pots, take care when you transplant them to the ground. Planting tomatoes too early can lead to soil drying out which could lead roots to rot. It is important to be aware that bacteria wilt can quickly kill plants.
Statistics
- It will likely be ready if a seedling has between 3 and 4 true leaves. (gilmour.com)
- Most tomatoes and peppers will take 6-8 weeks to reach transplant size so plan according to your climate! - ufseeds.com
- According to the National Gardening Association, the average family with a garden spends $70 on their crops—but they grow an estimated $600 worth of veggies! - blog.nationwide.com
- As the price of fruit and vegetables is expected to rise by 8% after Brexit, the idea of growing your own is now better than ever. (countryliving.com)
External Links
How To
How to apply Foliar Fertilizers
Foliar fertilizers may be applied to the leaves of plants by spraying. Foliar fertilizers are used to provide nutrients to plants. They also help to increase photosynthesis and water retention, resist disease, protect against pests and promote growth. They can be used for treating any plant, fruits, vegetables or flowers.
Foliar fertilizers are safe for the soil and do not cause any soil contamination. The fertilizer required depends on the type and size of the plant as well as how much foliage it has. Foliar fertilizers can be applied when the plant's active growth is taking place. This allows them faster to absorb the nutrients. These are the steps to follow when fertilizing your garden.
-
Be sure to determine the right type of fertilizer for you. Some products only contain one element, while others may include multiple elements. Ask your local nursery if you don’t know what product you need.
-
Be sure to follow the directions. Before spraying, be sure to read and understand the label. Spraying near doors and windows can cause damage. Keep out of reach of children and pets.
-
Use a hose attachment if available. If you don't want to spray too much, make sure to turn off your nozzle after each few sprays.
-
Mixing different types is a dangerous thing. Mixing two different kinds can cause some harmful effects, such as burning or staining of leaves.
-
Spray at least five feet away from the trunk. At least three feet should be spaced between the trunk of the tree and the edge where you plan on applying the fertilizer.
-
Before applying, wait until the sun sets before you do. Sunlight causes light-sensitive chemicals in the fertilizer to break down.
-
Spread the fertilizer evenly across the leaves. Spread the fertilizer evenly over large areas.
-
Let the fertilizer dry completely before watering.